Are your airless pump bottles empty? Do not throw them away. Refilling them can extend their use. This guide provides clear steps on how to do it.
Refilling airless pump bottles involves specific actions to ensure proper function. First, disassemble and clean the bottle. Next, carefully fill it with the desired product. Finally, reassemble and prime the pump. This process helps maintain product integrity and bottle longevity.
Understanding the mechanics of airless pump bottles makes refilling straightforward. This article will detail each necessary step for successful refilling.
How to refill airless pump bottles?
Do you know the correct method for refilling airless pump bottles? Many users find this task challenging without proper guidance. Following specific instructions simplifies the process.
Refilling airless pump bottles requires thorough cleaning and precise filling. Begin by disassembling the bottle into its components. Clean each part using warm water and mild soap, then dry completely. Pour the new product into the bottle carefully. Reassemble all parts, and prime the pump until the product dispenses consistently.
Proper refilling ensures the bottle functions as intended. It also helps preserve the quality of the product inside.
Preparing for Refill
Before starting the refill process, gather all necessary items. This ensures a smooth and efficient procedure.
- Empty Airless Bottle: Ensure the bottle is completely empty of its previous contents.
- Product for Refill: Have the new product ready for transfer.
- Warm Water and Mild Soap: Used for sanitizing bottle components.
- Small Funnel or Syringe: Aids in accurate and clean product transfer.
- Clean Cloth or Paper Towels: For drying washed components thoroughly.
Step-by-Step Refilling Procedure
Follow these steps for effective refilling:
- Disassemble the Bottle:
- Unscrew the pump head by twisting it counter-clockwise.
- Some designs include an inner plunger that may also be removed.
- Separate all components carefully.
- Clean All Components:
- Wash the bottle body, pump head, and any other parts with warm water and mild soap.
- Rinse all components thoroughly to remove any soap residue.
- Allow parts to air dry completely. Any remaining moisture can affect the new product.
- Fill the Bottle:
- Use a small funnel or syringe to transfer the new product into the bottle.
- Pour slowly to prevent spillage and air bubbles.
- Avoid overfilling. Leave a small space at the top.
- Reassemble the Bottle:
- Place all cleaned and dried components back together.
- Ensure the pump head is securely screwed onto the bottle body.
- Prime the Pump:
- Press the dispenser repeatedly until the product begins to flow smoothly. This expels any trapped air.
| Component | Action | Purpose |
|---|---|---|
| Pump Head | Unscrew | Allows access to the bottle's interior |
| Bottle Body | Clean and dry | Removes old product and prevents contamination |
| Inner Plunger | Clean and dry (if removable) | Ensures proper contact with new contents |
| New Product | Pour carefully | Prevents spills and air pockets during filling |
| Assembled Bottle | Prime | Initiates product dispensing |
Proper refilling extends the life of cosmetic packaging. It also helps maintain product hygiene.
How to fill a cosmetic vacuum bottle?
Are you looking for instructions on how to fill a cosmetic vacuum bottle? Many individuals find the process unclear due to the bottle's unique design. However, the procedure is manageable with the right approach.
Filling a cosmetic vacuum bottle requires specific attention to its airless mechanism. First, ensure the bottle is clean and dry. Next, carefully pour the cosmetic product into the bottle, minimizing air entrapment. Finally, reassemble the components and prime the pump until the product dispenses consistently. This method preserves product freshness by preventing air exposure.
The design of vacuum bottles protects sensitive cosmetic formulations. Accurate filling is crucial for this protection.
Understanding Vacuum Bottle Mechanisms
Vacuum bottles, also known as airless pump bottles, operate using a rising disc at the base. This disc pushes the product upwards, dispensing it without introducing air. This design helps preserve product integrity and extends shelf life.
Step-by-Step Filling for Vacuum Bottles
Follow these detailed steps for filling vacuum bottles:
- Clean the Bottle:
- Begin by disassembling and cleaning all parts of the bottle.
- Use warm, soapy water for thorough cleaning. Rinse all components completely.
- Allow all parts to air dry fully. This prevents contamination of the new product.
- Prepare the Product:
- Ensure the cosmetic product is ready for transfer.
- For thicker products, using a spatula or specific filling tool may be beneficial.
- Fill Slowly and Carefully:
- Hold the bottle upright on a stable surface.
- Slowly pour the product into the bottle's opening.
- Take care to avoid creating air bubbles, as these can hinder pump function.
- Fill the bottle close to the top, but do not allow it to overflow.
- Insert the Pump Mechanism:
- Carefully position the pump mechanism or inner plunger back into the bottle.
- If there is a separate plunger, gently press it down until it makes contact with the product.
- Screw the pump head firmly onto the bottle.
- Prime the Bottle:
- Press the dispenser repeatedly until the product starts to emerge.
- Initial pumps may release air. Continue pumping until a steady flow of product is achieved.
Important Considerations for Vacuum Bottles
- Minimize Air: The core principle of a vacuum bottle is to prevent air exposure. Avoid trapping air during filling.
- Sterile Conditions: Maintain cleanliness during the entire process to prevent product degradation.
- Patience during Priming: Priming an airless pump can require multiple presses. Consistent pumping is key for activation.
| Stage | Action | Rationale |
|---|---|---|
| Cleaning | Disassemble, wash, and thoroughly dry parts | Essential for hygiene and preventing spoilage |
| Product Transfer | Pour slowly, avoid air bubble formation | Ensures proper function and product protection |
| Reassembly | Securely reattach pump and plunger | Establishes the sealed, airless environment |
| Priming | Repeatedly dispense until product emerges | Removes residual air and initiates product flow |
Accurate filling practices are vital for maximizing the benefits of vacuum packaging. It safeguards product efficacy.
Is an airless pump bottle reusable?
Are airless pump bottles suitable for multiple uses? Many users consider the reusability of packaging for environmental and economic reasons. These bottles are often designed for reuse.
An airless pump bottle is typically reusable. The process involves thorough cleaning and careful refilling, ideally with the same type of product. Reusing these bottles contributes to waste reduction and offers a cost-effective packaging solution.
The design of airless pump bottles supports their reuse. This contributes to sustainable packaging practices.
Advantages of Reusability
Reusing airless pump bottles provides several benefits:
- Environmental Benefit: It reduces the amount of plastic waste, lessening impact on landfills.
- Economic Savings: Repeated use of bottles decreases the need for new purchases, resulting in long-term cost reduction.
- Product Protection: The airless system effectively preserves sensitive product formulations. Reusing them correctly maintains this protective quality.
Conditions for Reusability
Airless pump bottles are generally reusable under these circumstances:
- Physical Condition: The bottle must be free from cracks, damage, or defects in the pump mechanism.
- Product Compatibility: Ideal for refilling with the same product or a chemically compatible formulation.
- Cleanliness: Proper and thorough cleaning is essential to prevent contamination.
When to Exercise Caution with Reuse
Certain situations may make reusing an airless pump bottle less advisable:
- Product Type Change: Refilling with a different product type (e.g., switching from a strong acid to a gentle serum) can lead to adverse reactions due to residue.
- Damaged Components: A compromised pump or a fractured bottle will not function correctly and should not be reused.
- Highly Sensitive Products: Some extremely delicate formulations may require sterile, new containers to ensure stability.
- Difficult-to-Clean Residues: If previous product residues are challenging to remove completely, it is safer to use a new bottle.
Maximizing Reusability
To prolong the life and safety of reusable airless pump bottles:
- Immediate Rinsing: Rinse the bottle immediately after it becomes empty. This prevents product residue from drying and hardening inside.
- Proper Storage: Store cleaned and dried components in a clean, dry environment until the next refill.
- Regular Inspection: Before each reuse, inspect the bottle and pump for any signs of wear, damage, or degradation.
| Criterion | Suitability for Reuse | Rationale |
|---|---|---|
| Intact Bottle | Yes | Ensures structural integrity and proper sealing |
| Same Product | Yes | Minimizes risk of chemical incompatibility |
| Thorough Cleaning | Yes | Prevents microbial growth and product spoilage |
| Damaged Parts | No | Compromises functionality and product safety |
| Different Product | Use Caution | Potential for adverse interactions or contamination |
Reusing packaging is a practical choice for sustainability. Adhering to proper procedures ensures safety and effectiveness.
How do you open an airless pump bottle?
Are you having difficulty opening an airless pump bottle? Their sealed design often makes them seem difficult to access. However, specific methods allow for opening.
To open an airless pump bottle, typically twist the pump head counter-clockwise. Some designs feature an outer cap that removes before the pump head. For bottles not designed for easy reuse, gentle prying with a small tool might be necessary at the top or bottom seam, taking care to avoid damage if reuse is intended.
Accessing the interior of these bottles is sometimes necessary for refilling or ensuring complete product extraction.
Common Opening Methods for Airless Bottles
Most airless pump bottles can be opened using one of these common techniques:
- Twist-Off Pump Head:
- This is the most frequent opening mechanism.
- Hold the bottle body firmly to stabilize it.
- Rotate the pump head counter-clockwise until it unscrews and detaches.
- Pull-Off Cap Followed by Twist-Off Pump:
- Some bottles feature an external cap that pulls straight upwards to reveal the pump mechanism.
- Once the cap is removed, proceed to twist the pump head counter-clockwise to open.
- Twist-Off Bottom (Less Common Design):
- A smaller number of airless bottles have a base that twists off.
- Examine the bottom for an indication of a twisting mechanism or grooves.
- This method provides access to the internal plunger or for refilling directly.
- Pry-Off Top or Bottom (For Non-Reusable Designs):
- If the bottle is not designed for easy opening, gentle prying may be required.
- Use a slim, flat tool, such as a small screwdriver or a sturdy palette knife.
- Carefully insert the tool into the seam between the top/bottom and the main body of the bottle.
- Apply gentle leverage to separate the components. Exercise caution to avoid injury or excessive damage if reuse is desired.
Tips for Opening Stubborn Bottles
- Avoid Excessive Force: If a bottle feels stuck, applying too much force can cause breakage or damage to the mechanism.
- Consult Manufacturer Guidelines: Check the product or brand website for specific opening instructions, which may be provided.
- Gentle Heat (with Caution): For very tight screw-tops, a brief exposure to warm water may slightly expand the plastic, making it easier to twist. Ensure no water enters the bottle if product remains.
- Enhanced Grip: Using a rubber grip pad or even a rubber band around the pump head can provide better traction for twisting.
| Opening Method | Description | Primary Application |
|---|---|---|
| Twist-off Pump Head | Unscrewing the top part by rotating counter-clockwise | Most common, facilitates bottle reuse |
| Pull-off Cap + Twist | Removing an outer cover, then unscrewing the pump head | Common for sleek, protected designs |
| Twist-off Bottom | Detaching the base of the bottle by twisting | Less common, provides direct internal access |
| Pry-off Seam | Gently separating components using a flat tool | For non-reusable bottles or very tight seals |
Knowing how to open these bottles is practical for complete product usage and proper cleaning for reuse. Different designs require different opening approaches.
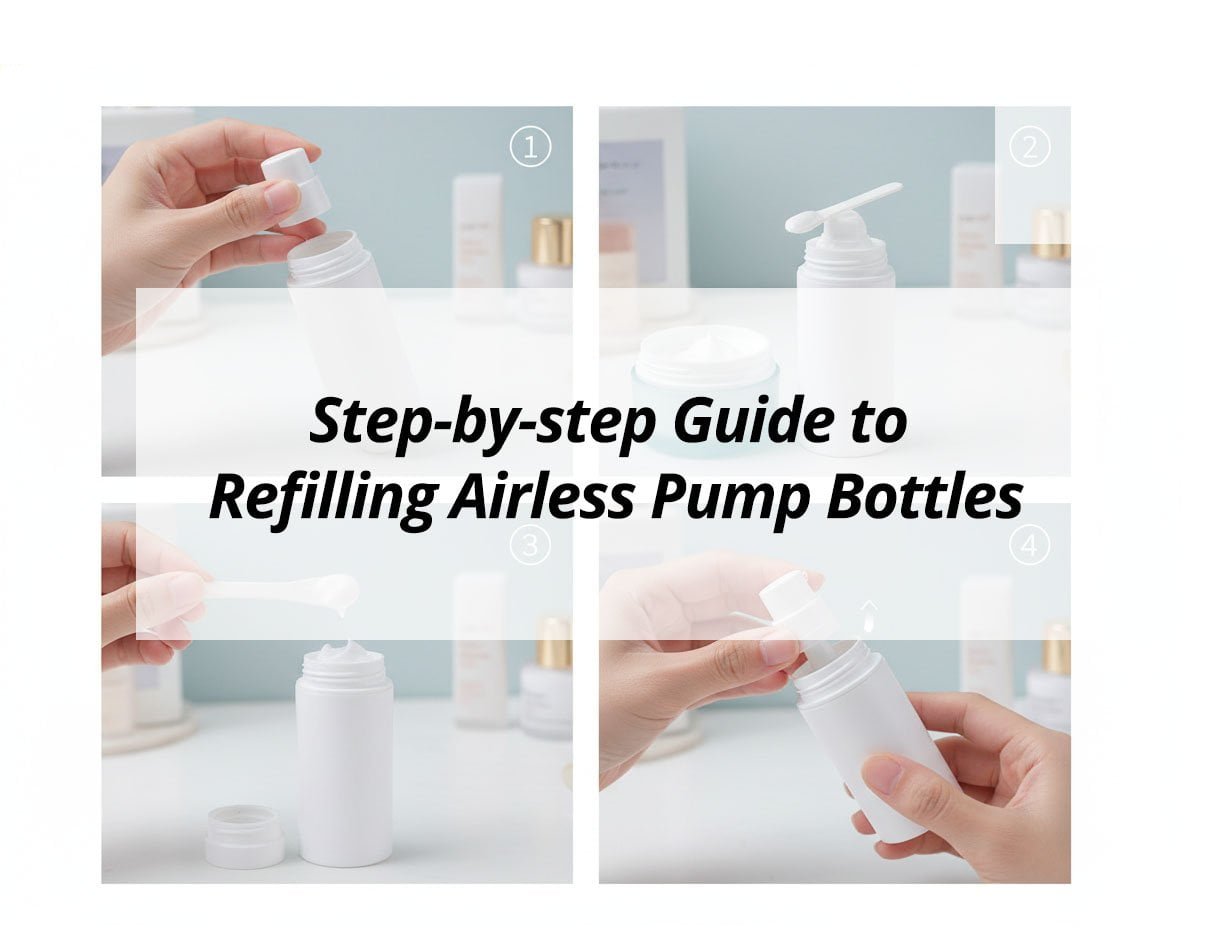
My Insights: Step-by-step Guide to Refilling Airless Pump Bottles
Frustrated with ineffective pump performance or product waste? Discover how to properly refill airless pump bottles for optimal dispensing.
To refill an airless pump bottle, clean and dry the container, use a funnel to add product slowly, avoid overfilling, and securely reattach the pump. Prime the pump until it dispenses properly, ensuring optimal functionality.
Ensuring Effective Refilling
Preparation and Equipment
- Cleaning: Ensure the bottle is free from residue and moisture to prevent contamination.
- Tools: Use funnels or spatulas for precise filling and air bubble reduction.
Step-by-Step Process
| Step | Description |
|---|---|
| Opening the Bottle | Twist the pump gently; inspect for damage before refilling. |
| Filling | Slowly add product using a funnel; avoid overfilling. |
| Reassembly | Reattach the pump securely and prime it multiple times. |
Tips for Success
- Avoid Clumps: Ensure product consistency for smooth functioning.
- Check Components: Inspect the pump for hidden locks or damage.
- Prime Properly: Initial pumps clear air, ensuring proper product flow.
Proper refilling of airless pump bottles enhances product usability, maintains freshness, and ensures efficient dispensing, minimizing waste and frustration.
Conclusion
Refilling airless pump bottles is a practical and environmentally conscious choice. By following proper cleaning, filling, and reassembly steps, users can extend the life of their packaging. This process helps maintain product quality and reduces waste.